
Tutorial ini menjelaskan cara mengatur server surat lokal menggunakan Postfix, Dovecot Dan Squirrelmail di CentOS 7. Tutorial ini tidak bisa membantu anda jika ingin mengirim atau menerima email ke luar seperti Gmail atau Yahoo. Namun, jika Anda ingin mengirim / menerima email ke luar, Anda harus mengkonfigurasi server email dengan IP publik, dan meminta ISP Anda untuk mengkonfigurasi data MX server email Anda di server DNS mereka.
Detail spesifikasinya adalah:
- OS : CentOS 7 64bit minimal server
- IP Address : 192.168.0.220/24
- Hostname : server1.descreated.local
Prasyarat:
1. Hapus sendmail MTA default terlebih dahulu jika sudah diinstal. Sendmail tidak akan diinstal secara default dalam instalasi minimal, sehingga Anda dapat melewati langkah ini.
# yum remove sendmail
2. Setup DNS server dan tambahkan catatan MX server Mail dalam file forward dan reverse zone.
Untuk menginstal dan mengkonfigurasi server DNS, lihat tautan berikut.
Dan, jangan lupa untuk meminta ISP Anda untuk mengarahkan IP statis eksternal Anda ke domain email Anda.
3. Tambahkan hostname di file “/etc/hosts”
# nano /etc/hosts
127.0.0.1 localhost localhost.localdomain localhost4 localhost4.localdomain4
::1 localhost localhost.localdomain localhost6 localhost6.localdomain6
192.168.0.220 server1.descreated.local server1
4. Saya akan menonaktifkan SELinux untuk mengurangi kompleksitas dalam konfigurasi postfix
# nano /etc/sysconfig/selinux
Ubah SELINUX=enforcing ke SELINUX=disabled
SELINUX=disabled
5. Install EPEL Repository
Webmail Squirrelmail tidak tersedia di repository resmi CentOS 7, oleh karena itu mari kita aktifkan repository EPEl-nya terlebih dahulu.
# yum install epel-release
6. Allow port 80 Apache di Firewall anda.
# firewall-cmd --permanent --add-port=80/tcp
Restart Firewall dengan script dibawah ini.
# firewall-cmd --reload
Install Postfix
Postfix merupakan agen transfer mail yang gratis (MTA).
Sekarang, install postfix dengan script dibawah ini.
# yum install postfix
Konfigurasi Postfix
Edit file “/etc/postfix/main.cf”:
# nano /etc/postfix/main.cf
Cari dan edit seperti dibawah ini:
## Line no 77 - Uncomment and set your mail server FQDN ##
myhostname = server1.descreated.local

## Line 85 - Uncomment and Set domain name ##
mydomain = descreated.local

## Line 101 - Uncomment ##
myorigin = $mydomain

## Line 115 - Uncomment and Set ipv4 ##
inet_interfaces = all

## Line 121 - Change to all ##
inet_protocols = all

## Line 166 - Comment ##
#mydestination = $myhostname, localhost.$mydomain, localhost,

## Line 167 - Uncomment ##
mydestination = $myhostname, localhost.$mydomain, localhost, $mydomain

## Line 266 - Uncomment and add IP range ##
mynetworks = 192.168.0.0/23, 127.0.0.0/8

## Line 421 - Uncomment ##
home_mailbox = Maildir/
Simpan dan keluar dari filenya.
Start/restart service postfix sekarang:
# systemctl enable postfix
# systemctl restart postfix
Testing Mail Server Postfix
Pertama, buatlah user dengan nama “ryan”
useradd ryan
Setting password untuk user fandi
passwd ryan
sekarang coba anda telnet localhost smtp
# telnet localhost smtp
Trying ::1...
Connected to localhost.
Escape character is '^]'.
220 server1.unixmen.local ESMTP Postfix
ehlo localhost     ## Type this line ##
250-server1.unixmen.local
250-PIPELINING
250-SIZE 10240000
250-VRFY
250-ETRN
250-ENHANCEDSTATUSCODES
250-8BITMIME
250 DSN
mail from:<fandi>     ## Type this - mail sender address ##
250 2.1.0 Ok
rcpt to:<fandi>     ## Type this - mail receiver address ##
250 2.1.5 Ok
data     ## Type this to input body of Email ##
354 End data with <CR><LF>.<CR><LF>
Welcome to vandee mail server     ## Body of the Email ##
.     ## Type dot (.) after composing your email ##
250 2.0.0 Ok: queued as E2B522032F93
quit     ## Type quit to exit from mail ##
221 2.0.0 Bye
Connection closed by foreign host.
Sekarang kita akan ke folder mail “fandi”, periksa apakah ada email baru yang telah diterima.
# ls /home/fandi/Maildir/new/
Sample output:
1437722056.Vfd01I203e3e7M938078.server1.descreated.local
BERHASIL, ternyata email baru diterima oleh “ryan”
Sekarang, untuk membaca emailnya, silahkan masukkan perintah dibawah ini:
# cat /home/ryan/Maildir/new/1437722056.Vfd01I203e3e7M938078.server1.descreated.local
Sample output:
Return-Path: <[email protected]>
X-Original-To: ryan
Delivered-To: [email protected]
Received: from localhost (localhost [IPv6:::1])
 by server1.descreated.local (Postfix) with ESMTP id E2B522032F93
 for <sk>; Sun, 09 Mar 2020 12:42:36 +0700 (WIB)
Message-Id: <[email protected]>
Date: Sun, 09 Mar 2020 12:42:36 +0700 (WIB)
From: [email protected]

Welcome to descreated mail server
SELESAI, Postfix yang anda install berjalan dengan sempurna.
Install Devecot
Devecot adalah open source IMAP dan POP3 mail server untuk system Linux/Unix.
Untuk Install, silahkan run perintah dibawah ini:
# yum install dovecot
Konfigurasi Devecot
Edit file “/etc/devecot/devecot.conf”:
# nano /etc/dovecot/dovecot.conf
lakukan perubahan seperti dibawah ini:
## Line 24 - umcomment ##
protocols = imap pop3 lmtp

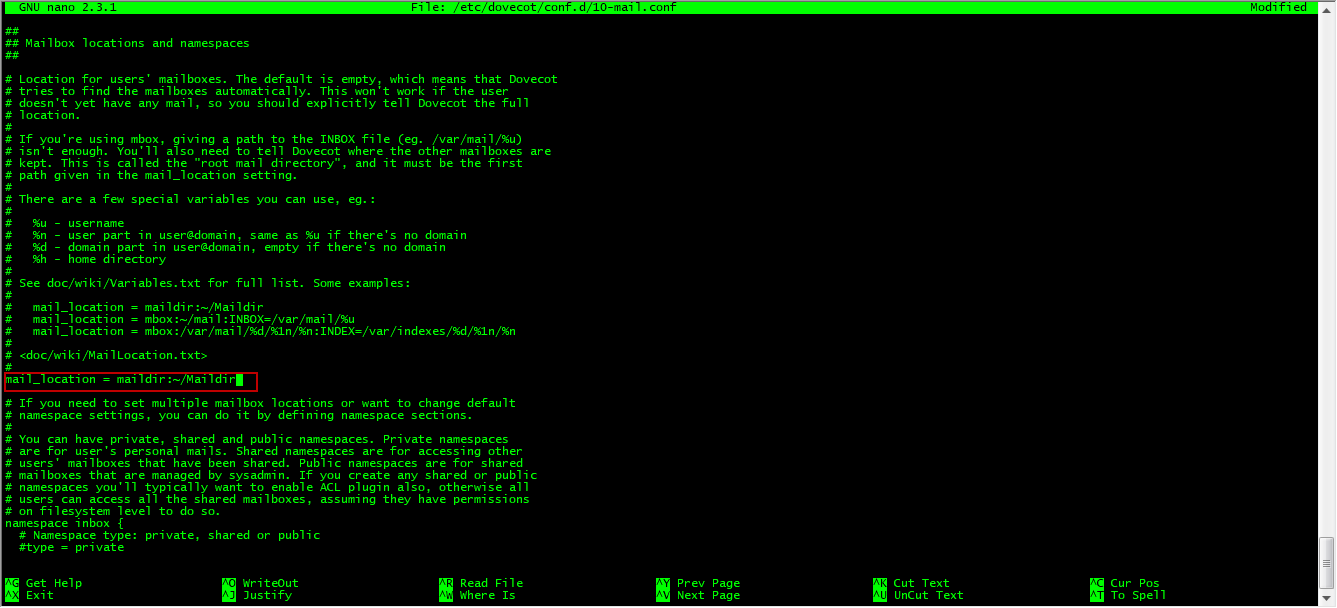
Edit file “/etc/devecot/conf.d/10-mail.conf’:
# nano /etc/dovecot/conf.d/10-mail.conf
Lakukan perubahan seperti dibawah ini:
## Line 24 - uncomment ##
mail_location = maildir:~/Maildir
Edit file “/etc/dovecot/conf.d/10-auth.conf”
# nano /etc/dovecot/conf.d/10-auth.conf
Lakukan perubahan seperti dibawah ini:
## line 10 - uncomment##
disable_plaintext_auth = yes

## Line 100 - Add the word: "login" ##
auth_mechanisms = plain login
Edit file “/etc/dovecot/conf.d/10-master.conf”
# nano /etc/dovecot/conf.d/10-master.conf
Lakukan perubahan seperti dibawah ini:
## Line 91, 92 - Uncomment and add "postfix"
#mode = 0600
   user = postfix
   group = postfix
[...]

Start service Dovecot:
# systemctl enable dovecot
# systemctl start dovecot
Testing Dovecot
Yukkk, kita test konfigurasi devecot-nya, masukkan perintah dibawah ini:
# telnet localhost pop3
Masukkan perintah secara manual yang ditandai oleh huruf tebal.
Trying ::1...
Connected to localhost.
Escape character is '^]'.
+OK Dovecot ready.
user fandi     ## Enter the mail user name ##
+OK
pass fandi     ## Enter the password ##
+OK Logged in.
retr 1     ## Type this command to view mail ##
+OK 415 octets
Return-Path: <[email protected]>
X-Original-To: fandi
Delivered-To: [email protected]
Received: from localhost (localhost [IPv6:::1])
 by server1.descreated.local (Postfix) with ESMTP id E2B522032F93
 for <fandi>; Sun, 09 Maret 2020 12:42:36 +0700 (WIB)
Message-Id: <[email protected]>
Date: Sun, 09 Mar 2020 12:42:36 +0700 (WIB)
From: [email protected]

Welcome to vandee mail server
.
quit     ## Type 'quit' to exit ##
+OK Logging out.
Connection closed by foreign host.
SELAMAT, anda berhasil melakukan konfigurasi dan test Devecot.
Install Squirrelmail
Mengirim dan menerima pesan mail dengan perintah yang dilakukan di atas sangatlah tidak mudah setiap saat. Jangan khawatir kita akan membuatnya dengan mudah untuk mengirim dan menerima email menggunakan webmail klient yang disebut Squirrelmail melalui browser.
Pastikan EPEL anda telah aktif untuk menginstall Squirrelmail ini, gunakan perintah dibawah ini untuk menginstallnya.
# yum install squirrelmail
Konfigurasi SquirrelMail
Silahkan arahkan ke folder “/usr/share/squirrelmail/config”
# cd /usr/share/squirrelmail/config/
dan jalankan perintah dibawah ini.
# ./conf.pl

Anda akan menemukan wizard yang terbuka, masukkan pilihan nomor 1 untuk mengatur Organization Detail:
SquirrelMail Configuration : Read: config.php (1.4.0)
---------------------------------------------------------
Main Menu --
1. Organization Preferences
2. Server Settings
3. Folder Defaults
4. General Options
5. Themes
6. Address Books
7. Message of the Day (MOTD)
8. Plugins
9. Database
10. Languages

D. Set pre-defined settings for specific IMAP servers

C Turn color off
S Save data
Q Quit

Command >> 1

Set Organization name dan tekan enter.
We have tried to make the name SquirrelMail as transparent as
possible. If you set up an organization name, most places where
SquirrelMail would take credit will be credited to your organization.

If your Organization Name includes a '$', please precede it with a \.
Other '$' will be considered the beginning of a variable that
must be defined before the $org_name is printed.
$version, for example, is included by default, and will print the
string representing the current SquirrelMail version.

[SquirrelMail]: DescreatedMail
Lakukan yang anda ingin edit sesuai kebutuhan. Setelah selesai, tekan “S” untuk menyimpan perubahan dan tekan “R” untuk kembali ke menu awal.
Sekarang, tulis angka “2” untuk setup mail Server Settings, seperti domain dan mail agent.
SquirrelMail Configuration : Read: config.php (1.4.0)
---------------------------------------------------------
Main Menu --
1.  Organization Preferences
2.  Server Settings
3.  Folder Defaults
4.  General Options
5.  Themes
6.  Address Books
7.  Message of the Day (MOTD)
8.  Plugins
9.  Database
10. Languages

D.  Set pre-defined settings for specific IMAP servers

C   Turn color off
S   Save data
Q   Quit

Command >> 2

Masukkan angka “1”, lalu masukkan nama domain anda (Mis. descreated.local) dan tekan enter.
SquirrelMail Configuration : Read: config.php (1.4.0)
---------------------------------------------------------
Server Settings

General
-------
1. Domain : localhost
2. Invert Time : false
3. Sendmail or SMTP : Sendmail

A. Update IMAP Settings : localhost:143 (uw)
B. Change Sendmail Config : /usr/sbin/sendmail

R Return to Main Menu
C Turn color off
S Save data
Q Quit

Command >> 1

The domain name is the suffix at the end of all email addresses. If
for example, your email address is [email protected], then your domain
would be example.com.

[localhost]: descreated.local
Masukkan angka “3” dan ubah dari sendmail ke Postfix MTA (mis. SMTP)
SquirrelMail Configuration : Read: config.php (1.4.0)
---------------------------------------------------------
Server Settings

General
-------
1.  Domain                 : unixmen.local
2.  Invert Time            : false
3.  Sendmail or SMTP       : Sendmail

A.  Update IMAP Settings   : localhost:143 (uw)
B.  Change Sendmail Config : /usr/sbin/sendmail

R   Return to Main Menu
C   Turn color off
S   Save data
Q   Quit

Command >> 3
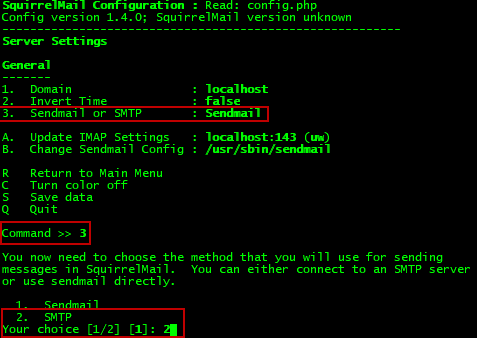
Masukkan angka “2” untuk beralih dari Sendmail ke Postfix (SMTP).
You now need to choose the method that you will use for sending
messages in SquirrelMail.  You can either connect to an SMTP server
or use sendmail directly.

  1.  Sendmail
  2.  SMTP
Your choice [1/2] [1]: 2
Sekarang masukkan “S” diikuti oleh “Q” untuk menyimpan dan keluar dari konfigurasi Squirrelmail.
Buat vhost squirrelmail di apache config.
# nano /etc/httpd/conf/httpd.conf
Tambahkan baris berikut ini.
Alias /webmail /usr/share/squirrelmail
<Directory /usr/share/squirrelmail>
 Options Indexes FollowSymLinks
 RewriteEngine On
 AllowOverride All
 DirectoryIndex index.php
 Order allow,deny
 Allow from all
</Directory>
Restart Service Apache
# systemctl restart httpd
Membuat mail users
# useradd test
# passwd test
Access Webmail
Buka web browser anda, lalu ketikan http://ip-address/webmail atau http://domain-name/webmail.
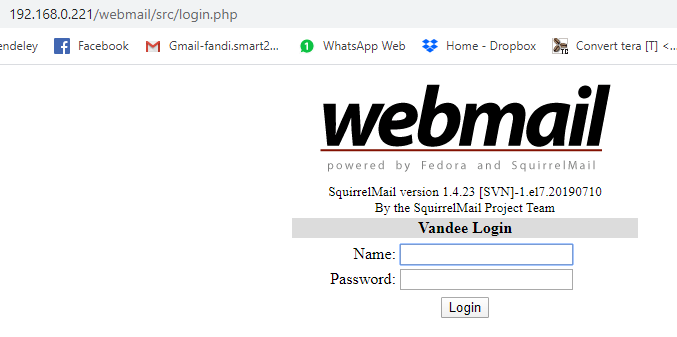
Sekarang silahkan anda login dengan user yang telah anda buat sebelumnya.
Name     : test
Password : test
Jika anda mengalami error ketika login seperti gambar dibawah ini.

anda harus install netstat dahulu.
# yum install net-tools

Setelah itu silhakan cek port 143, 110 dari netstat yang telah diinstall, untuk memastikan port tersebut jalan dan tidak terblok.

dari gambar diatas port 143 dan 110 sudah allow oleh semua IP. Jadi kita bisa buka webmail kembali.
Silahkan refresh browser anda lalu login kesambali.


